So you’re getting a blog post on this because I missed having something to show Garrett before he finished work for the day (he’s several timezones ahead of me and I was overly slow.) 🙂 This may be crispier than it would have been had I caught him.
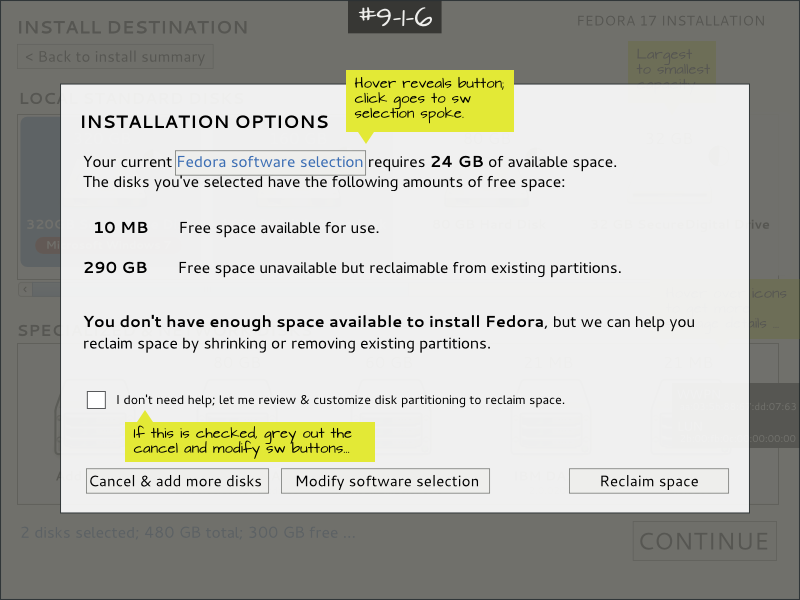
Let me catch you up on where we are with reclaiming space from pre-existing partitions during installation. First of all, what is this design meant to address? Well, if you’ve selected what you want to install and selected disks to install it on, and don’t have enough free space in any single continguous free chunk but you do have enough latent space to cobble together enough space to install to – this is the screen that tries to guide you through shrinking your pre-existing partitions to make that latent space useful. This is not the custom partitioning screen design (just to make that clear. 🙂 )

So where were we?:
- Rough Thoughts on Reclaiming Space from Partitions During Installation – We walked through the lightbox dialog that appears when you’re in the situation described above, and then a few possibilities for what the actual space reclaiming dialog looks like. We tried a tree view (too clunky!), clickable & draggable partitions (difficult with a complex disk layout, and non-representative of the physical layout of the disk. We also don’t want to get into the business of repositioning partitions, which this kind of interface seems to encourage.)
- Reclaiming Space from Partitions During Installation Round 2
– Using the feedback from the first post, some adjustments to the click & drag model. First, space that can’t be resized is displayed but greyed out and demarcated as not being resizeable – while I don’t like having useless chunks taking up precious real estate, they do help the user identify the disk they live on I think.) Then, little clicky widgets to show the current space usage of a partition with its smallest potential shrunken size. A delete mechanism with confirmation.
Okay, so the reason I mentioned Garrett above is because he was in Boston for the Red Hat Summit and offered to sit down and go through the anaconda (Fedora installer) mockups with me and give me some feedback / critique. When we came to this screen, his initial reaction was that it was too complicated. I explained some of the concerns that had been brought up about it here in this blog’s comments and in IRC, further adding to the complication. He suggested having a single slider to shrink each physical disk. While my brain is still a little upside-down trying to figure out how this might work, it does seem a more simple and easy-to-understand approach.
Here’s the general scheme:
- You need X amount of space and you don’t have it in a single partition chunk. We tell you how much you need.
- We figure out how much we can squeeze the pre-existing partitions per device.
- Per device, you get one slider. The more you slide, the more you squeeze down the partitions on that disk.
- The anaconda developers (understanding the technology and its limitations, reliability / lack-thereof, and support) dictate a scheme by which space is made that they feel comfortable supporting (rather than the user having to be as intimately familiar with all of the schemes and pitfalls involved themselves):
- Any free unpartitioned space is grabbed first.
- Next, any free space in a pre-existing file system that is adjacent to unpartitioned free space is grabbed.
- Beyond that, we venture into logical partition territory. We add in any other slots of free and unpartitioned space on the disk.
- Finally, we squeeze the remaining file systems in pre-existing partitions, in order of most-free-space to least, and add them in to the logical volume as well.
So what might this beastie look like?
Here’s what it might look like when you first enter it and click on the second device in the list on the left:

And here’s what it would look like if you dragged the slider from 8GB free to 10GB free, meeting the requirement of 10GB you had for installation:

So the story behind the numbers in the slider there:
- 8GB – this is a freebie. You started out with an 8GB chunk of free, unpartitioned space.
- 10GB – you get this in the second mockup by squeezing down the BOOTCAMP partition.
- 12 GB – you get this by making a logical volume and added the 2GB of free, unpartitioned space to it.
- 18GB – you get this by shrinking the Mac partition and adding the freed space to the logical volume.
Random points:
- The diagrams of the partitions on disk are no longer clickable. Maybe you could hover over the partitions for a bit more data on each in a tooltip.
- The diagrams of the partitions now reflect reality in terms of the physical layout on disk. This was a big problem with the earlier mockups, because obfuscating the underlying physical layout means you miss out on stuff that’s kind of important if you know what you’re doing. If not, I guess you can ignore the diagram. <= maybe a glaring weak point in the design here. Should diagram be under a disclosure area?
- The slider doesn’t make sense right now because it starts in the middle. You would have 8GB in this scenario to start since you have that nice 8GB chunk of free and unpartitioned space there.
- We’re thinking of reserving 10% of the free space in any partition to lessen the chance we render it unusable, especially if it’s an OS partition.
- Yeah, that’s HFS+ being shrunk. Won’t work if it’s journaled though.
The general approach here
I will keep saying that an operating system installer is complex. It presents the user with a great deal of risk and in some cases, necessarily deals with some complex situations (wouldn’t it be lovely to only have to support ext4 on physical partitions?), especially when you add in enterprise storage support (see my ranty runthrough of this from the Linux Plumbers’ Conference a couple of years ago; it makes better reading with Rufscript installed.)
While on the one hand it pains me to design something that I know is complex and in a rainbow pony world would not be, there is a balance between presenting only a simple & clean interface to all users and enabling those users to get their jobs done. Sometimes there’s a serious tension between the two. When simple & clean design treads in the “oh crap, I’m making it really difficult for an entire class of users to get their jobs done!” territory, I think there’s an approach we’re veering towards in a lot of the anaconda designs that might be a good general solution for these kind of dilemmas:
Pair a simple interface with a method of enabling the subject matter experts (in this case, the installer developers) to dictate a sensible and dynamic scheme that will have the best chance of success for the user, based on the experts’ intimate knowledge of the technology and its limitations.
Maybe better said in other words, unpacking the ‘dynamic’ bit somewhat:
Between a completely open-ended, training-required interface (e.g., kickstart) and an overly simplified UI (left to your imagination), you can establish a system where experts dictate several possible scenarios that are shifted between based on a user’s task-oriented preferences.
Two examples of this in the anaconda redesign:
- This disk space reclaiming tool, where depending on how much space the user wants, we go from creating a new partition from blank space up to adding non-adjacent partitions together in a single logical volume (the latter being the last resort since it’s preferrable to have a real physical partition.)
- The custom partitioning tool, where we present a clean default filesystem layout and enable the users to just accept it or modify it as needed. We also ask the user how much disk space they ultimately want for various places in their filesystem, and we figure out which opt-in technical features would be available to them based on how much they requested so that goal isn’t undermined by choices that don’t seem related.
If I’m terribly wrong in any of this, I continue to encourage those who know better to please leave a productive comment. 🙂


I think that LVM is the key to simplifying the problem. The installer can collect free pieces, and make them into Physical Volumes – not necessarily contiguous (but as much so as possible). The resulting volume group has a definite amount of free space, and allocation of filesystem, swap, etc, can then proceed simply and cleanly without regard to complex disk layout.
That is how I work manually in the Custom Layout. First – create PVs. Then create VG, LVs and install.
Grub2 supports booting from an LV boot volume. However, I have to manually set that up. Anaconda for F17 gets an error when trying to use LV /boot. While it isn’t *that* much of a complexity to add “oh, by the way, we need a small plain partition for /boot” to the “scrounge space for PVs” phase, it would be a lot cleaner to create only PVs in the scrounge space phase.
I think LVM as a technology is problematic though. I’m not sure of all of the technical reasons why, but I have certainly heard complaints that it gives you a performance hit. btr and RAID can also be used to make single logical volumes out of otherwise scattered free space – do you have a need or preference that LVM gives you over btr or RAID?
The key phrase is “single logical volume”. If you were going for a single bootable ext4 logical volume, linear RAID would be reasonable. LVM lets you easily allocate, delete, and resize multiple filesystems. This is especially important for Fedora, with 6 month release cycles. You want to keep a separate /home filesystem, and a “system” volume for each release. For instance, I have f14, f16, and f17 logical volumes now, and can boot into any of them. Logical volumes also work well with virtual machines.
For the simple case of logical volumes, LVM and linear RAID work the same way – a table of extents in the kernel mapping logical to physical sectors – and performance is the same. Additional features of LVM, like snapshots, introduce a performance hit – but only when used.
Snapshots are a performance hit – but are very useful. They let you make consistent backups of filesystems (that don’t support snapshots natively, like btrfs does), and make instant logical copies of volumes to run experiments on. I make a snapshot of /home when migrating to a new Fedora release. I can either delete the snapshot, or merge the origin into the snapshot.
RAID is often used underneath LVM for mirroring (LVM mirroring is not well developed yet). So it would not be too unreasonable for the installer to collect partition space into a single volume with linear RAID, then give the user a choice of making that volume a PV, or a filesystem.
BTW, does grub handle linear RAID?
The sound bite version: btr and RAID are fine. The DOS partition table is ugly and nasty. When I can get away with it, I make the entire disk into a PV, and skip the DOS partition table altogether.
Actually, I just though of a significant advantage of LVM over linear RAID: LVM PVs can be resized without scrambling data (by changing the sector offsets of all following volumes). And the advantage of LVM over btrfs for Fedora installs is being able to allocate independent filesystems for new Fedora versions. (I don’t know if btrfs handles resizing underlying volumes.)
But for a single filesystem install, btrfs would eliminate a mapping layer, for a possible performance win.
Just a quick note to say what many probably are thinking (but scared to post) – It is great to see someone working on this with the end users in mind. Thanks for working on it.