Showing 7 Result(s)

Fedora package social networking

So we’ve been talking about a reincarnation of Fedora Community (the app). Stuff to take note of: Yes, it looks like Facebook. (As my coworker Partha likes to remind me, Fedora had the white lowercase f on blue first. 🙂 ) The main navbar for the package is directly under its name & summary. Additional …

Fedora Community (the app) Update

The story up ’till recently So you may have heard about Fedora Community, a web application we developed and launched in 2009. Or, maybe not. From the wiki planning page for the project: Fedora Community is a web portal designed to make it easier for package maintainers to do their job. The goal is to …

Newly-expanded Fedora Logo Guidelines

Due in major part to Ian Weller’s extensive work on expanding Fedora’s logo usage guidelines, we now have updated logo usage guidelines that cover the usage of the Fedora logo in more detail, including: Coverage of the Fedora application and group sublogos. Coverage of the Fedora Remix logos. Coverage of the Fedora Foundations logos. Downloadable …

How to create graphics for a Fedora spin

I’ve been spending some time lately putting together some how-to documentation for various tasks the Fedora design team does on a regular basis.
This is a how-to on how to create graphics for a Fedora spin. During a recent design ticket review we noticed a few requests for spin graphics, and there seemed to be some confusion on how to create them. Hopefully this guide helps.

Overview

There’s three main graphics you’ll need to create a page for your spin at spins.fedoraproject.org. What you’ll need before you start creating these graphics:

Things you need to get from the spin maintainer

  • The abbreviated version of the spin’s name. This should be used in the name of the graphics files for your spin. For example, the ‘Fedora Electronic Lab’ has an abbreviated name of ‘Electronic-lab’, so:
    • It is listed as ‘Electronic-Lab’ in the spins directory on the front page of http://spins.fedoraproject.org
    • Its mini graphic is named: electronic-lab-mini.png
    • Its feature graphic is named: electronic-lab-feature.png
    • Its tagline graphic is named: electronic-lab-tagline.png
  • A tagline for the spin. Here’s some examples from current spins (shorter is better!):
    • KDE: “Be free.”
    • LXDE: “Your desktop, light as air.”
    • ‘FCE: “Speed up your desktop.”
    • Electronic Lab: “An advanced electronic design and simulation platform for micro-nano electronics engineering.”
    • Design Suite: “Open creativity.”
Anaconda Language Selection, F14

Anaconda Language & Keyboard Layout Selection

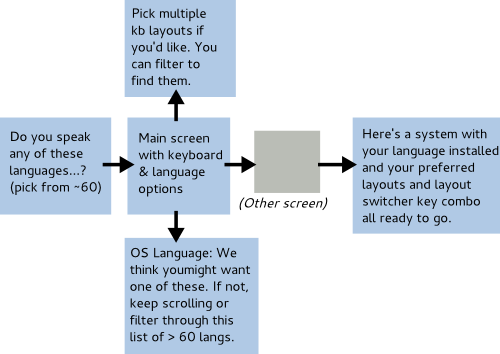
…If we went with this design, then, the language selection flow in Anaconda might look something like this:

A probably non-exhaustive list of how this would change Anaconda is as follows:

  • Folks who don’t speak English would be able to more easily pick out their language in the initial set of ~60 or so languages Anaconda supports since they’d be available in their native name.
  • You’d be able to install the OS in a language beyond the limited set that the Anaconda UI itself is available in.
  • You’d be able to choose between a preferred language with limited coverage or a less-preferred language with fuller coverage since limited coverage languages would be flagged.
  • You’d be able to use more than one keyboard layout, which was not possible before. Multi-lingual users would not have this extra step post-install.
  • The keyboard command for switching between keyboard layouts would be more visible, and you’d be able to switch between them in the installer itself (useful for an American with accent marks in her name. *cough*)
  • You’d be able to modify the keyboard command for switching between keyboard layouts, and not need to configure it post-install.
  • You’d be able to filter in both the keyboard layout and language lists.
  • You’d be able to take a selected keyboard layout for a test drive before committing to it.

Delicious Inkscape mockup export script

Thanks to Ray’s bash scripting prowess and help, I am now in possession of a delicious script that makes exporting multiple PNGs from one master mockup Inkscape SVG file easy.
Further development might involve automagical wiki uploading, perhaps based on a wikipage name you input into the script..? 🙂 ?
I documented it pretty well so I it speaks for itself. I guess the only thing I’d add, is to give the frames in your Inkscape SVG an id, you need to right-click the object you’re using as a frame, and select ‘Object Properties’ for the menu. You don’t need to right-click and select the ‘Object Properties’ item for each and every frame—you may simply keep the ‘Object Properties’ dialog open and click on each frame object as you go.